Illustrator使用SSR法绘制高级等角图(3)
文章来源于 活力盒子,感谢作者 lucky翻译 给我们带来经精彩的文章!Step 4
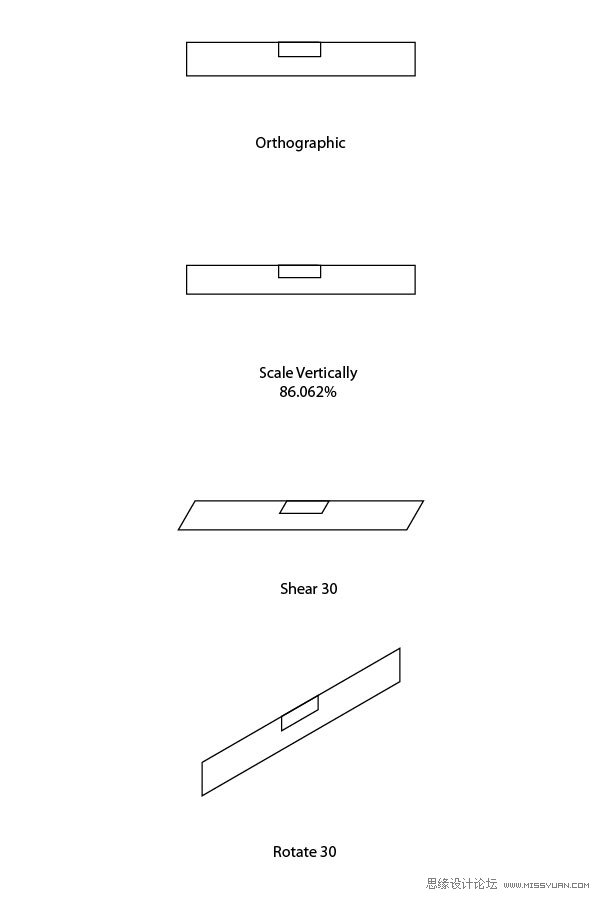
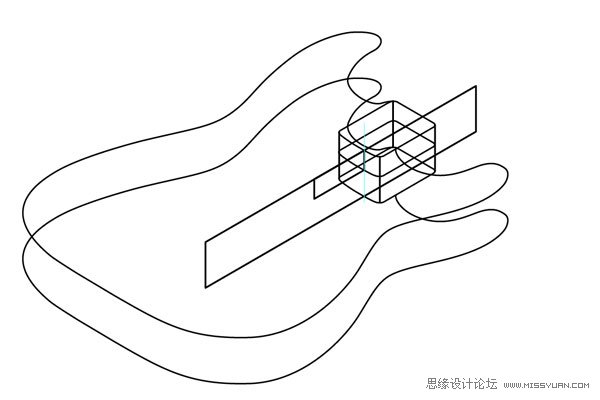
Now that you’ve created your base you have something to work off of. By taking the side view of the orthographic and scale, shear, rotate (SSR) it onto the Isometric plane you can figure out the thickness of the guitar body.
4. 现在你完成了底部的绘制。再来绘制吉他的侧面视图。比例缩放,倾斜,旋转(SSR)。并且在等角平面上,你可以利用这个侧面视图计算出吉他琴身的厚度。
图示分别为:orthography基本图形
Scale vertically:比例缩放,不等比:垂直:86.062%
Shear 30:倾斜30度
Rotate 30:旋转30度
Step 5
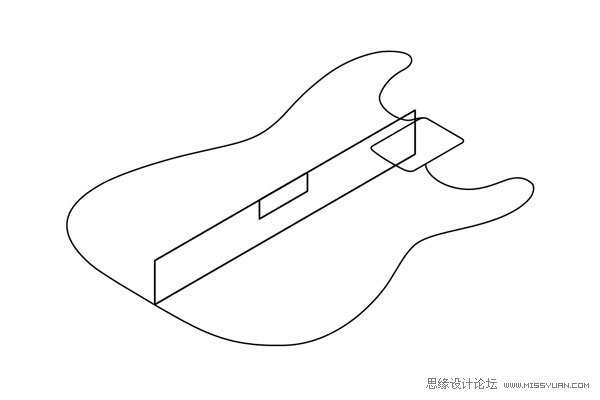
Line up the bottom edge of the guitar body with the corner of the orthographic side view.
5. 将吉他琴身底下(底层的面)的边和吉他侧面视图上的控制角点(锚点)对齐。
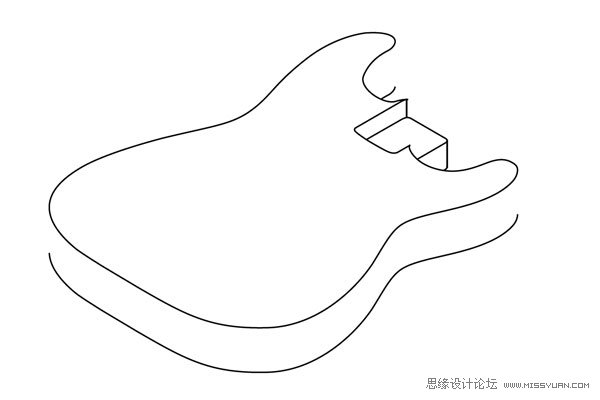
Step 6
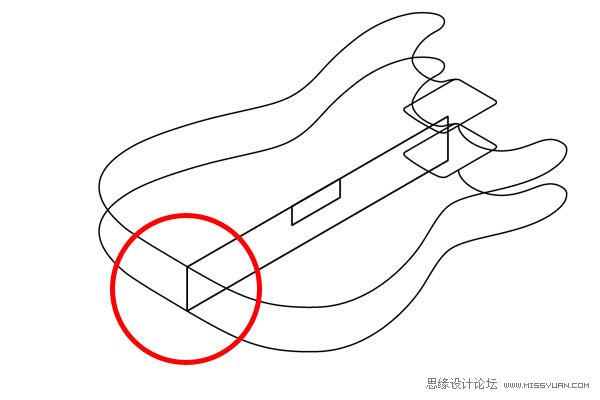
Next you want to copy the outline of the guitar body and move it up to the top edge of the side view. To do this use your Selection tool and click and drag on the edge of the outline, before letting go, engage the Option button to make a copy. You should also use the Shift key to constrain the movement. Holding the Shift key while moving the shape will ensure it stays lined up with the original.
6. 现在你要复制一个吉他琴身的外形轮廓,把它移到吉他侧面视图上的顶部的边上(图示)。要实现这一步,你可以使用选择工具,然后点选图示的下面那个点(吉他琴身与侧面视图相交的下面那个点),然后把它平移到图示的上面那个点(吉他琴身与侧面视图相交的上面那个点)。平移之前,先选择相应的选项按钮,制作吉他琴身的副本。你也可以使用Shift键来约束对象的移动。当移动形状时,按住Shift键,确保对象是向上平移的。
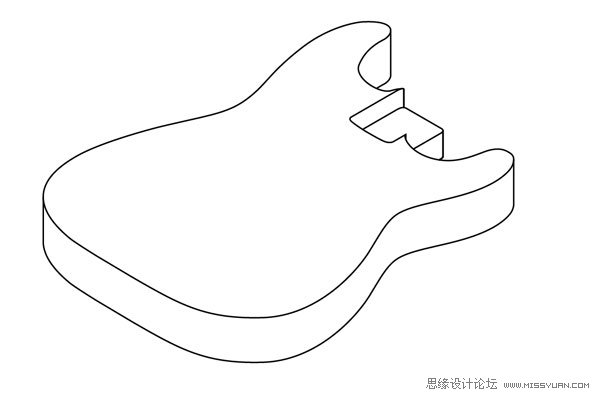
Step 7
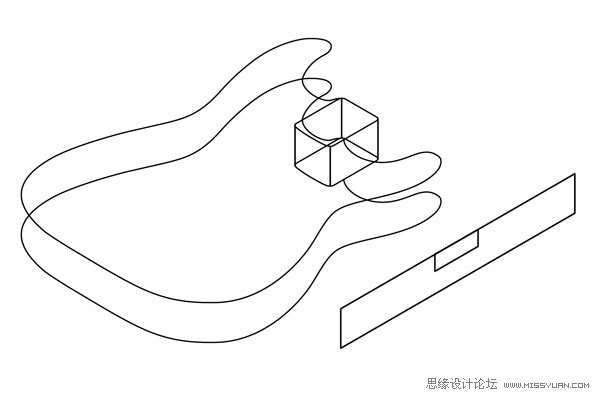
Now you have blocked out the top and bottom planes of the guitar body. The next step is to cut out the spot where the neck is inset. Start by connecting the top and bottom planes of the neck opening so it’s easier to see the area that you are working on.
7. 现在你大致画好了吉他琴身的顶部和底部的面。下一步是,把插入的琴颈(侧面视图)从吉他琴身里抽出,然后连接琴颈开口的地方。这样有助于你看清楚接下来要绘制的内容。
Step 8
Using the side view you can mark off how deep the neck cutaway goes into the body. You now have three planes, the top, bottom and depth of the cutaway.
8. 你可以使用侧面的视图来测算嵌到吉他里的琴颈剖面的深度。这时,你就有了3个面:顶部、底部和剖面的深度。

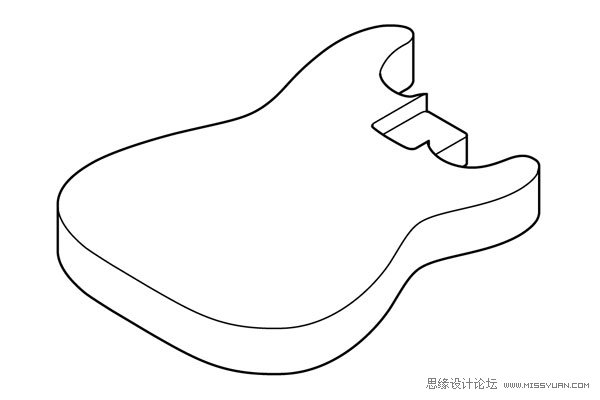
Step 9
The next step is to use the Scissors tool to cut away all the excess lines you don’t need anymore. This is often the hardest part for an artist new to technical drawing. All the overlapping lines and shapes can be overwhelming. But if you take your time and start with the clear big shapes it will help to clean up the more complex areas.
9. 下一步是使用剪刀工具剪去多余的线条。这对于绘画技术不熟练的人来说,是比较难操作的一步。可能有很多需要隐藏的重叠线条和形状(这些线条和形状必须剪掉)。但如果你有时间的话,最好还是再画一个大一点、清晰一点的形状,这将更有助于你清理不需要的线条。
Step 10
After clearing away all the line you don’t need anymore, connect your corners and finish the shapes.
10、 剪掉不需要的线条之后,连接控制角点(锚点),以完成最后的吉他琴身。
Add some line quality and you’re finished.
加深一些线条,完成成品图。
Conclusion
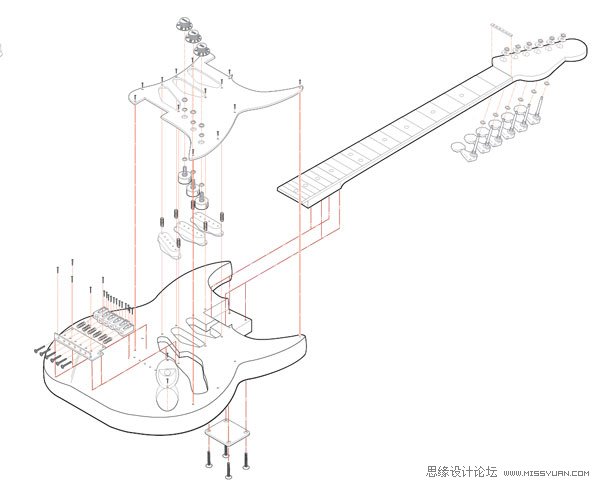
You have now finished the body of the guitar. You could continue on and complete the entire guitar, the exact same steps would apply for each part. This is an example of an exploded isometric of a Stratocaster I did a few years ago with this method.
尾声
现在你完成了吉他的琴身。你可以继续绘制和完善整个吉他造型,接下来的每一部分使用的都是之前同等的方法。下图是Stratocaste(吉他的型号)等角图的一个实例,这是我几年前绘制的,使用的也是这个方法。
 情非得已
情非得已
-
 Illustrator绘制扁平化风格的建筑图2020-03-19
-
 Illustrator制作扁平化风格的电视机2020-03-18
-
 Illustrator绘制渐变风格的建筑场景插画2020-03-12
-
 佩奇插画:用AI绘制卡通风格的小猪佩奇2019-02-26
-
 插画设计:AI绘制复古风格的宇航员海报2019-01-24
-
 房屋插画:AI绘制圣诞节主题的房屋插画2019-01-21
-
 圣诞插画:AI绘制简约风格圣诞节插画2019-01-21
-
 灯塔绘制:AI绘制的灯塔插画2019-01-21
-
 时尚船锚:AI绘制鲜花装饰的船锚图标2019-01-18
-
 扁平宝箱图形:AI绘制游戏中常见的宝箱2019-01-18
-
 Illustrator制作复古风格的邮票效果2021-03-10
-
Illustrator绘制渐变风格的建筑场景插画
相关文章2072020-03-12
-
 使用七巧板法绘制简约的插画作品
相关文章4032019-08-29
使用七巧板法绘制简约的插画作品
相关文章4032019-08-29
-
 透视网格:详解AI中的透视网格及使用方法
相关文章18082019-04-14
透视网格:详解AI中的透视网格及使用方法
相关文章18082019-04-14
-
 2.5D插画:用AI绘制2.5D风格剪纸插画
相关文章8432019-03-08
2.5D插画:用AI绘制2.5D风格剪纸插画
相关文章8432019-03-08
-
 渐变插画:使用AI绘制磨砂风格的插画
相关文章9492019-03-02
渐变插画:使用AI绘制磨砂风格的插画
相关文章9492019-03-02
-
 矢量插画:使用AI制作滑板车插画教程
相关文章6612019-02-26
矢量插画:使用AI制作滑板车插画教程
相关文章6612019-02-26
-
 图标设计:使用AI绘制扁平化快餐图标
相关文章5472019-02-21
图标设计:使用AI绘制扁平化快餐图标
相关文章5472019-02-21
-
 立体图标:用AI绘制2.5D等距立体图标
相关文章3472019-02-21
立体图标:用AI绘制2.5D等距立体图标
相关文章3472019-02-21
