Photoshop���Ʊ��������ëˢ(3)
������Դ�� ICONFANS����л���� LDL �����Ǵ��������ʵ����£�Step 14
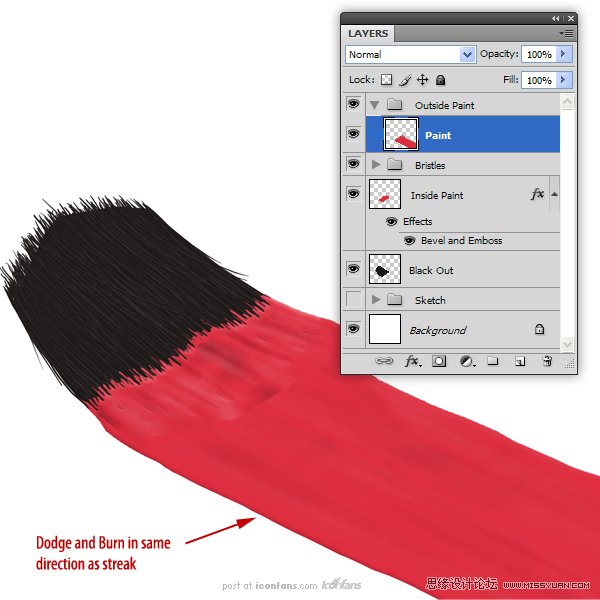
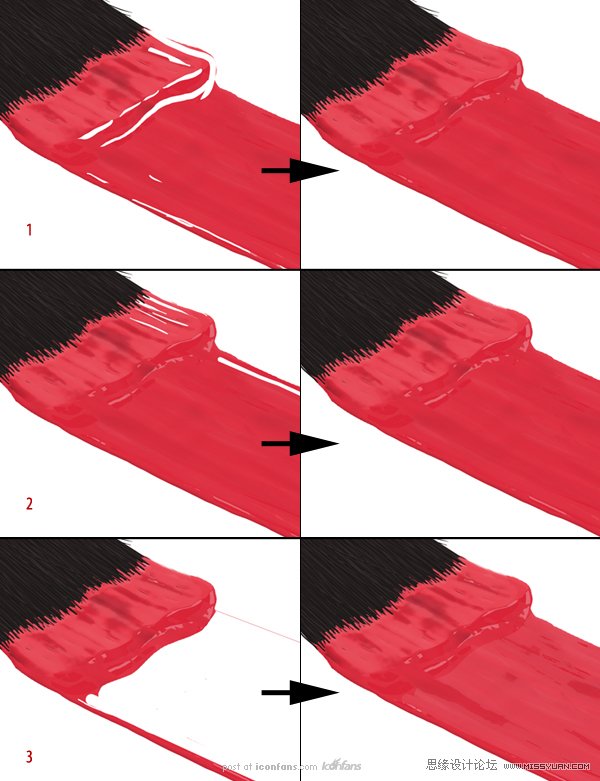
Use the Dodge and Burn Tools toadd some subtle variation to the streak. When you’re done, merge this layerwith the “Paint” layer. Rename the layer to “Paint.”
(��“����”��“����”���ߣ�������������һЩϸ�仯����������ˣ���“Paint”ͼ��һ��ϲ���������Ϊ“Paint”.)
Step 15
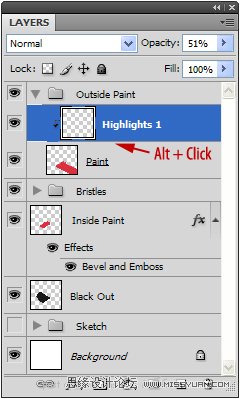
Now, we are going to give thepaint that wet look. To start, create a New Layer called “Highlights 1″ andmake this a clipping layer (use Alt + Click on the Layers Panel).
���ڣ�����Ҫ������ʪ�У��½�һ����Ϊ“Highlights 1” ͼ�㣬����һ�����в�(��ͼ�����ʹ��Alt+���� )
Step 16
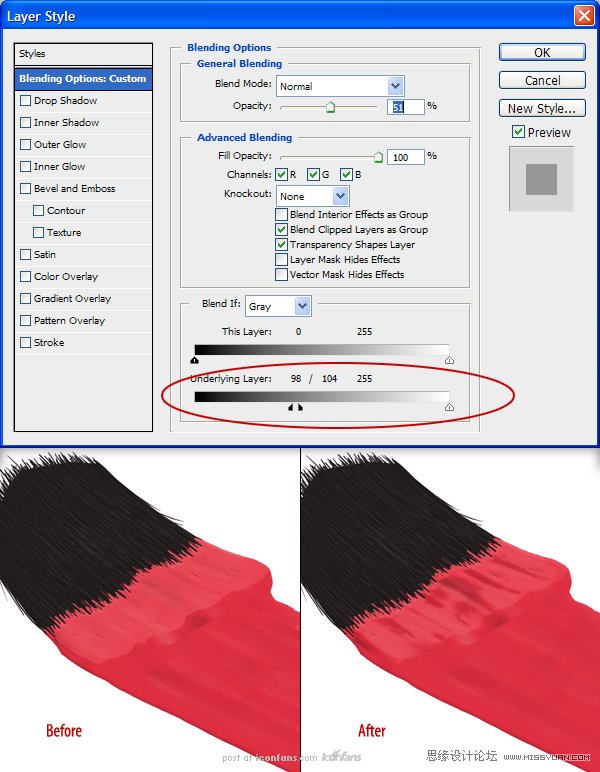
Now, draw in some white highlights as shown. Set this layer’sopacity to 11%
(������ͼ��ʾ������һЩ��ɫ�ĸ߹⣬�������ͼ��IJ�����Ϊ11%��)

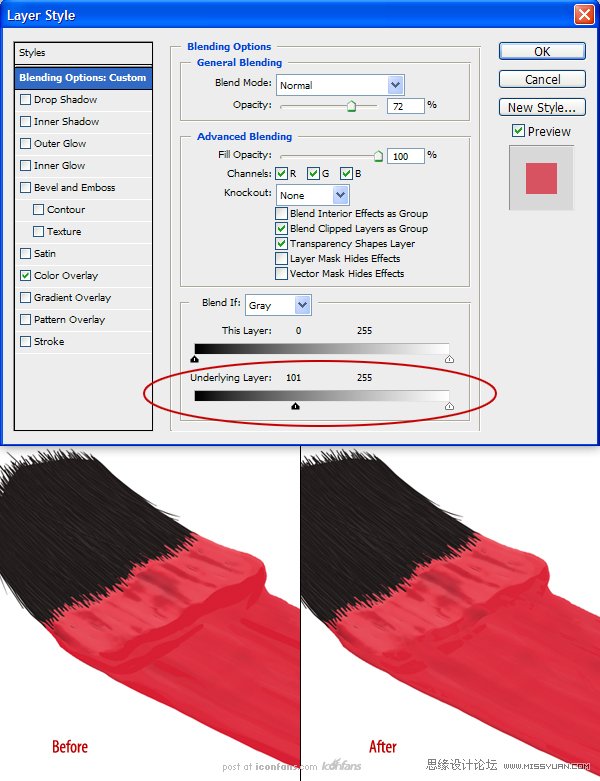
Step 17
Open the layer’s Layer Styles and adjust the “Blend If: UnderlyingLayer” sliders as shown
(�����ͼ���ͼ����ʽ������“�����ɫ��”������ͼ��ʾ. )
Step 18
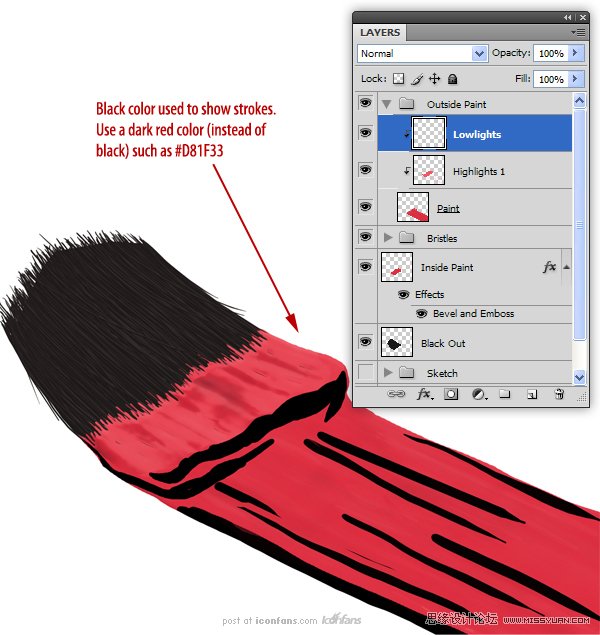
Next, we are going to do thesame with a darker color. Create a new clipping layer called “Lowlights” anduse a darker red to paint in some lowlights.
(�����������ǽ���ͬ��һ���������ɫ���½�һ����Ϊ“Lowlights”�ļ��в㣬��ʹ�ð���ɫͿˢ����Щ“Lowlights”�ϡ�)
Step 19
Set the “Lowlights” layer’sopacity to 72% and open the Layer Styles to adjust the Blend If sliders asshown.
(����“Lowlights”ͼ�㲻����Ϊ72%�������ͼ���ͼ����ʽ������“�����ɫ��”������ͼ��ʾ.)
Step 20
We can keep using thistechnique of adding highlights and adjusting its Blend If sliders to completethe ‘wet’ look of paint (I used this technique to add 3 more highlights).(���ǿ�����ͬ�����ַ�����“highlights”����������“�����ɫ��“��������������ʪ��(�����������������3�����ϵ�“highlights”.)
Step 21
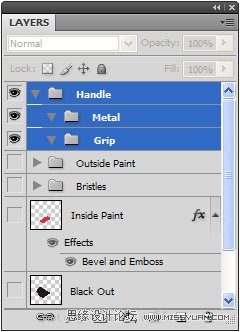
Now that the bristles and paintare done, we can create the rest of the brush. Hide all layers associated withthe paint and bristles. Next, create a New Group called “Handle”. Inside thatgroup, create 2 new groups called “Metal” and “Grip”.
(����ˢë�������Ѿ���ɣ����ǿ��Դ���ëˢ���������֡����������й�ˢ�Ӻ�ˢë��ͼ�㡣���������½�һ������Ϊ“Handle”�����������½�2���飬�ֱ�����Ϊ“Metal”and “ Grip”.)
Step 22
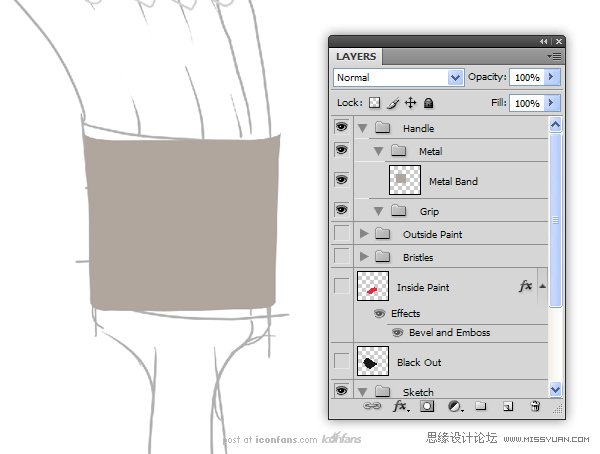
In the “Metal” group, create aNew Layer called “Metal Band.” Using the sketch as a guide, create the shape ofthe metal band that holds the bristles in place. I found it easier to createthe brush’s handle upright. It may help to go back to the sketch and create acopy to rotate it so that the brush is standing up.
(��“Metal”����½�һ��ͼ����Ϊ“Metal Band”���Բ�ͼΪ�ο��������ܰ�סˢë�Ľ��������Ҿ��ô���һ����ֱ��ˢ�������ס������Ԏ����ص��݈D���K����һ�����������D���@�ӵ�ˢ�Ӿ�����������)
 ��ǵ���
-
 Photoshop����ĥɰ���IJ廭��Ʒ2021-03-16
-
 Photoshop���AI������ƽ��������Ů�廭2021-03-11
-
 Photoshop���AI���Ʊ�ƽ��������Ů�廭2020-03-13
-
 Photoshop���AI���ƴ�������廭��Ʒ2020-03-13
-
 Photoshop����ʱ�д������ֻ�APPͼ��2020-03-12
-
 Photoshop���������ʮ����ֻ�ͼ��2020-03-12
-
 ����ƿ�滭��PS���Ʋ����ʸе�ħ��ƿ2020-03-11
-
 ���ع�������PS��ƵȾ����صĹ���ͼ��2019-03-20
-
 ʥ�����ˣ�ʹ��PS����ʥ�����˲廭2019-02-21
-
 Lumix�����PS���Ʒ�ɫ��������̳�2019-01-18
-
Photoshop���AI������ƽ��������Ů�廭2021-03-11
-
Photoshop����ĥɰ���IJ廭��Ʒ2021-03-16
-
 ������滭��PS���Ʊ���ĺ�����ͼ��
�������7222019-01-07
������滭��PS���Ʊ���ĺ�����ͼ��
�������7222019-01-07
-
 ��ҵ�廭��PS���Ʊ����DC�����廭
�������8962018-12-20
��ҵ�廭��PS���Ʊ����DC�����廭
�������8962018-12-20
-
 Photoshop�����������������DZ���ͼ��
�������19312018-11-03
Photoshop�����������������DZ���ͼ��
�������19312018-11-03
-
 Photoshop���Ʊ���ij���֩�����̳�
�������11872018-09-17
Photoshop���Ʊ���ij���֩�����̳�
�������11872018-09-17
-
 Photoshop���Ʊ������Ϸ����ͼ��
�������4902018-09-12
Photoshop���Ʊ������Ϸ����ͼ��
�������4902018-09-12
-
 Photoshop�����������ͼ��̳�
�������8722018-09-03
Photoshop�����������ͼ��̳�
�������8722018-09-03
-
 Photoshop���Ʊ���������ӳ����ƽ̳�
�������14742018-08-23
Photoshop���Ʊ���������ӳ����ƽ̳�
�������14742018-08-23
-
 Photoshop���Ʊ���������DZ��̳̽�
�������12252018-08-16
Photoshop���Ʊ���������DZ��̳̽�
�������12252018-08-16
