Photoshop绘制超真实的铅笔教程(2)
文章来源于 iconfans.org,感谢作者 leenjia 给我们带来经精彩的文章!Step 8第8步
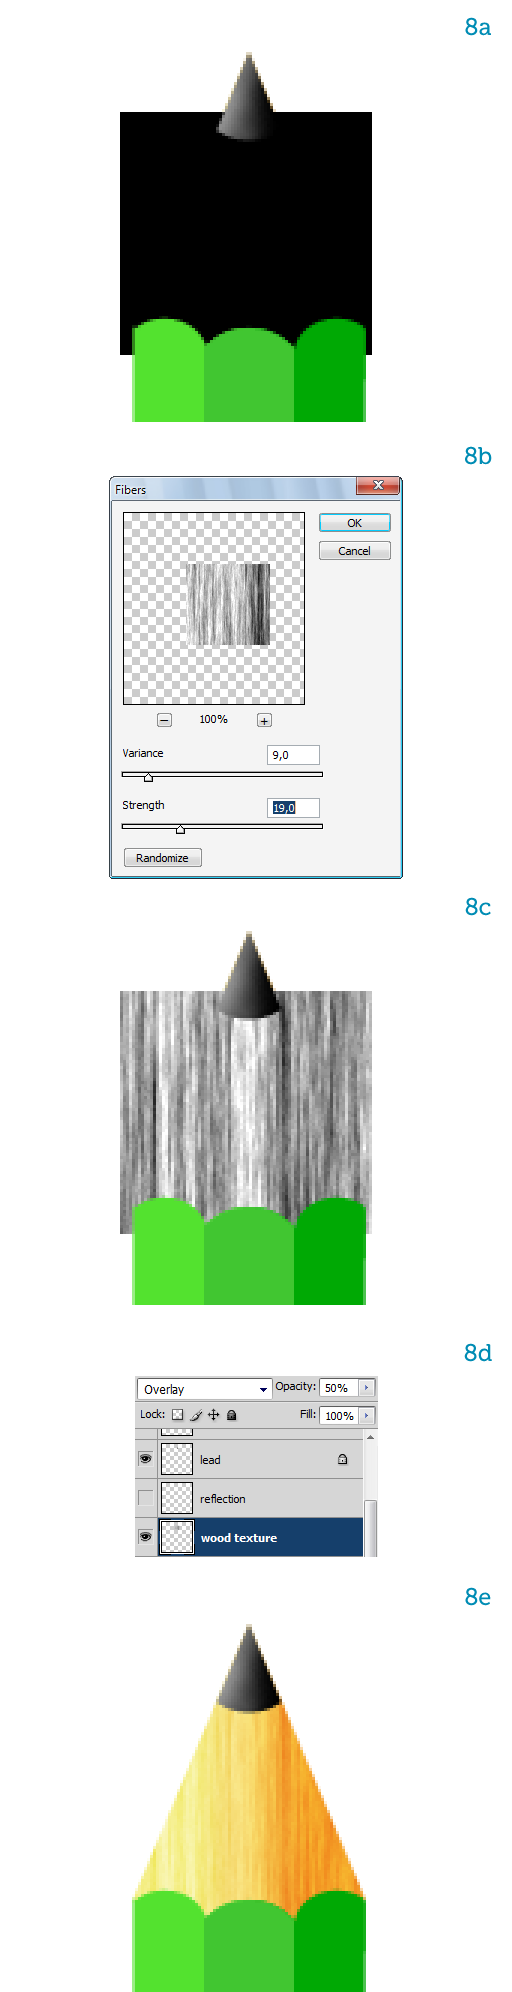
Type D to activate the default colors (black and white).D型激活默认的颜色(黑色和白色)。
Create a black square on a new layer between the "tip" and the "lead" and name it "wood texture" (8a).创建之间的“小费新层一个黑色正方形”和“领导”,并命名为“木材纹理”(8A)条。
Go to Filter > Render > Fibers and choose the same values as in image 8b.转到滤镜“>渲染”纤维,并选择在图像8B条相同的值。
The resulting texture (8c) hides the "tip" so we reduce the Opacity to 50% and choose the Overlay blending mode (8d).由此产生的纹理(第八期丙)隐藏的“小费”,所以我们不透明度降低到50%,并选择覆盖混合模式(8d)。
The wooden tip now has a nice color and a realistic grain (8e).木一角现在有一个很好的颜色和现实粮食(腋)。
Step 9第9步
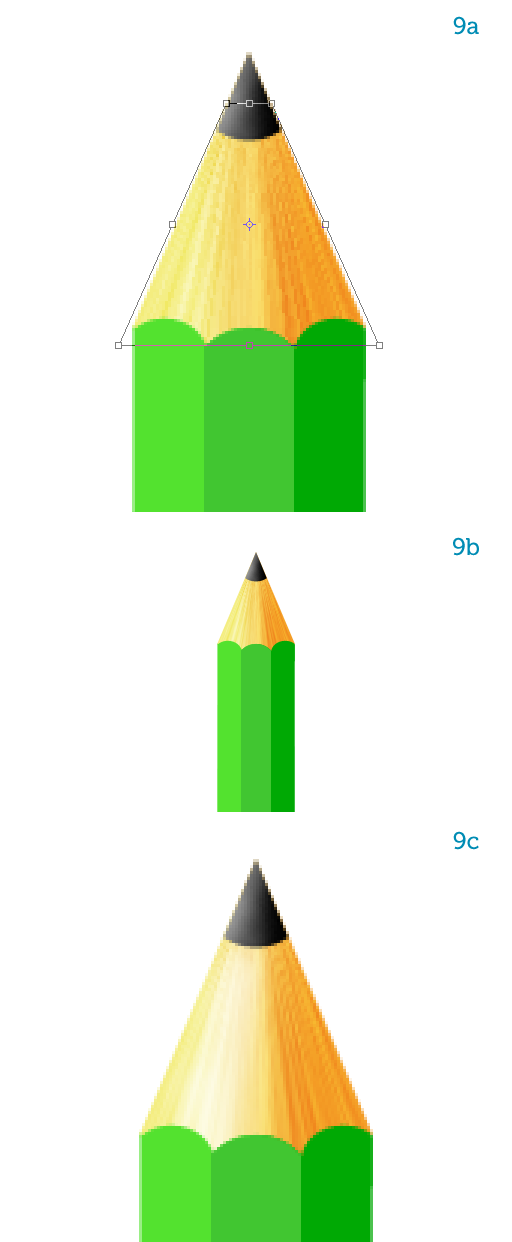
All we have to do now is deform the "wood texture" so it follows the contour of the "tip."所有我们现在要做的是变形的“木纹”,因此它遵循了“小费轮廓。
”
To do that type Command + T to activate Free Transform, then right-click the texture on the canvas and choose Perspective.为此,键入Command + T将启动自由变换,然后右键单击画布上的纹理和选择视角。
Drag the top anchor points inward to fit the texture to the "tip" (9a).拖动锚点顶部向内以适应纹理的“小费”,(90)。
Take a look at what we have so far (9b).看一看我们迄今(9B条)看看。
We want to add a bit of shininess to the pencil so let's paint the main highlight on the "tip" on a new layer, using a soft, white brush.我们想补充一点的光亮的铅笔,以便让我们画上的“小费一个新的层”的主要亮点,用软,白刷。
Reduce the highlight's opacity to let the texture shine through (9c).减少突出的透明度,让通过(9C条)纹理光泽。
Step 10第10步
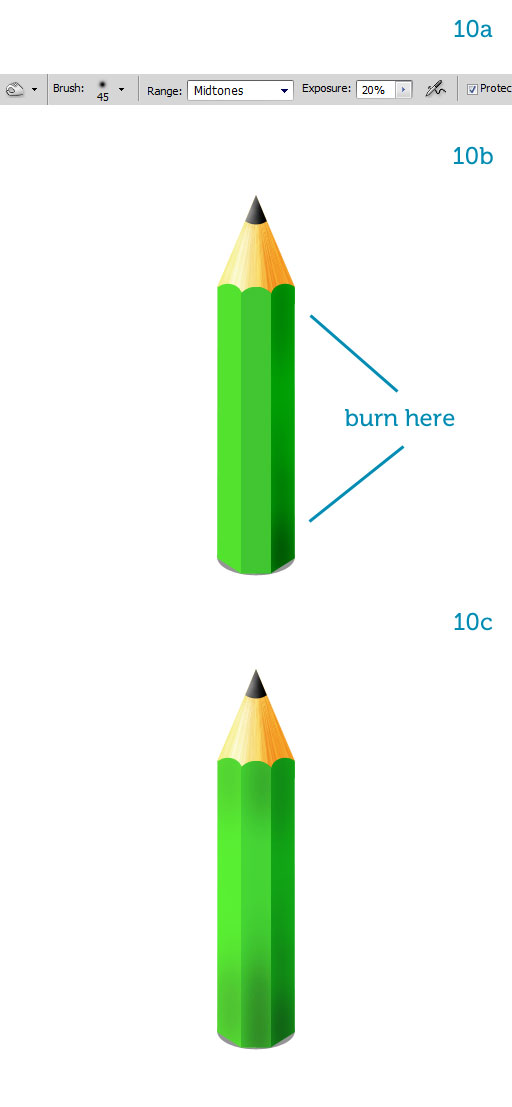
Let's introduce some color variation on the pencil's body, it looks flat right now.让我们介绍一些对铅笔的体色变化,但现在看起来平坦。
Select the Burn Tool (O) from the toolbar and set it up as in image 10a.选择刻录工具的工具栏(O)和设置它在图像10A条。
It's important to use a large, soft brush and very low opacity.重要的是要使用大,软刷和非常低的透明度。
Use several brush strokes to darken the top and the bottom of all three sides, making the bottom darker (more brush strokes).使用几种笔画变暗的顶部和底部的所有三个方面,使底部暗(更多笔画)。
Try it on the "bottom" layer first to get a feel for the Burn Tool.尝试在“底部”层中第一个获得的烧伤工具感觉到。
Once you're satisfied with the shading (10b), repeat this for the remaining two layers.一旦你满意阴影(10B条),重复其余两层这一点。
Make sure the pencil becomes progressively darker as you go to the right and to the bottom (10c).请确保铅笔逐渐变得黑暗,当您去的权利和底部(-10℃)。
Step 11第11步
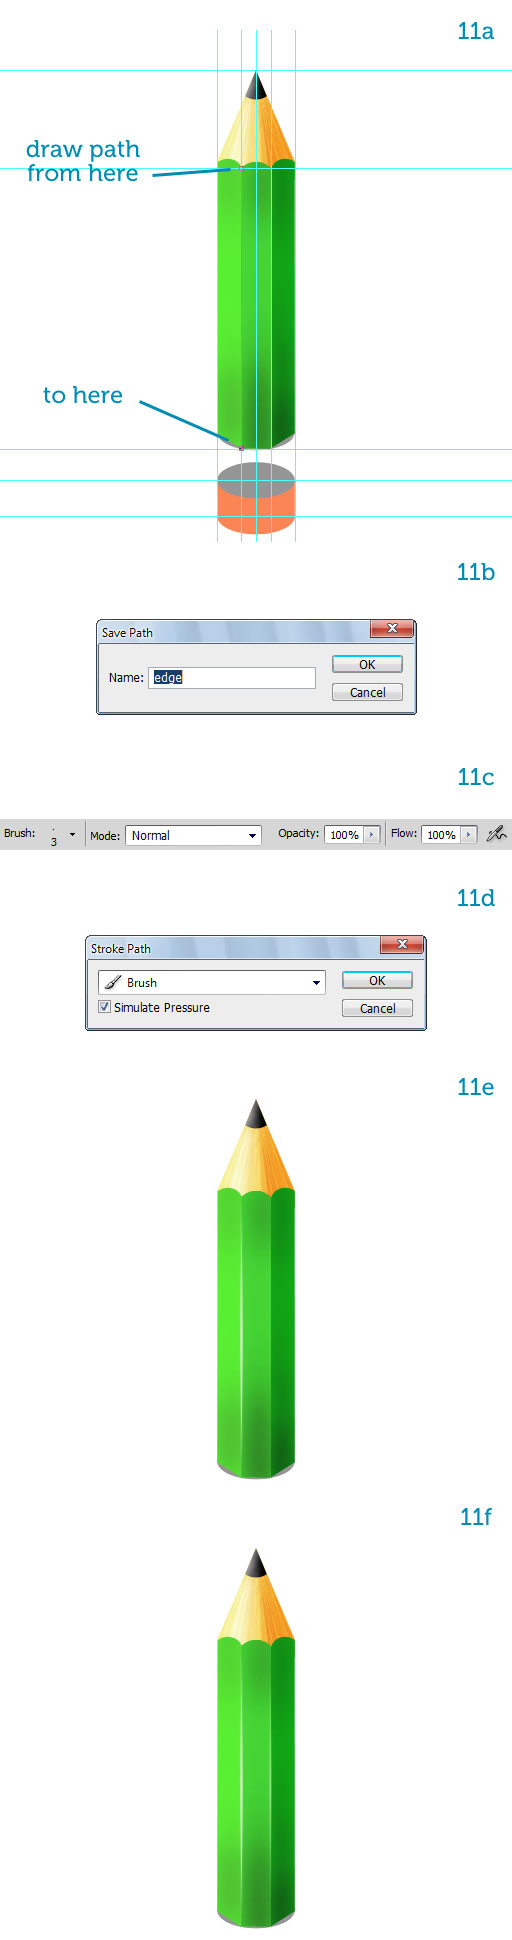
Let's make the edges pop out.让我们的边缘弹出。
With the guides showing and Snap active, draw a path along the left vertical side (11a).随着导游的积极表现和管理单元,绘制沿左侧垂直侧(11A)条路径。
In the Paths palette double-click it to name it "edge" (11b).在路径调色板双击它命名为“边缘”(B款)。
Now set up a 3px, hard-edged, white brush (11c).现在成立了一个3px,硬边,白刷(11C条)。
Create a new layer on top of the three sides and select it.
创建一个对三方新的层,顶部选择它。
In the Paths palette right-click on the "edge" and choose Stroke Path.在路径调色板的权利的“边点击”,然后选择描边路径。
From the pop-up window select the Brush and toggle on the "Simulate Pressure" option (11d).
从弹出式窗口中选择在“模拟压力”选项(11d的)刷和切换。
This is what it looks like: a nice, tapered highlight (11e).这是它看起来像:一个不错的锥形突出(11E条)。
Name the layer "edge."名称层“的边缘。
”
Create a second edge by copying the first one.通过复制创建第一个第二个优势。
Make the copy a bit transparent since it's closer to the bottom where less light arrives (11f).副本有点透明的,因为它比较接近底部到达那里少轻(11层)。
 情非得已
情非得已
-
 Photoshop绘制磨砂风格的插画作品2021-03-16
-
 Photoshop结合AI制作扁平化滑轮少女插画2021-03-11
-
 Photoshop结合AI绘制扁平化风格的少女插画2020-03-13
-
 Photoshop结合AI绘制春字主题插画作品2020-03-13
-
 Photoshop绘制时尚大气的手机APP图标2020-03-12
-
 Photoshop绘制立体感十足的手机图标2020-03-12
-
 玻璃瓶绘画:PS绘制玻璃质感的魔法瓶2020-03-11
-
 像素工厂:用PS设计等距像素的工厂图标2019-03-20
-
 圣诞老人:使用PS绘制圣诞老人插画2019-02-21
-
 Lumix相机:PS绘制粉色的照相机教程2019-01-18
-
Photoshop结合AI制作扁平化滑轮少女插画2021-03-11
-
Photoshop绘制磨砂风格的插画作品2021-03-16
-
Photoshop绘制磨砂风格的插画作品
相关文章1702021-03-16
-
Photoshop结合AI制作扁平化滑轮少女插画
相关文章2032021-03-11
-
 Photoshop绘制搞怪的胖子人像教程
相关文章6912020-09-26
Photoshop绘制搞怪的胖子人像教程
相关文章6912020-09-26
-
 Photoshop绘制立体风格的序章图标
相关文章8612020-04-01
Photoshop绘制立体风格的序章图标
相关文章8612020-04-01
-
Photoshop结合AI绘制扁平化风格的少女插画
相关文章7992020-03-13
-
Photoshop结合AI绘制春字主题插画作品
相关文章4762020-03-13
-
Photoshop绘制立体感十足的手机图标
相关文章6362020-03-12
-
 像素绘画:用PS绘制像素风格树木教程
相关文章10652019-03-26
像素绘画:用PS绘制像素风格树木教程
相关文章10652019-03-26
